
The UX Iterative Cycle
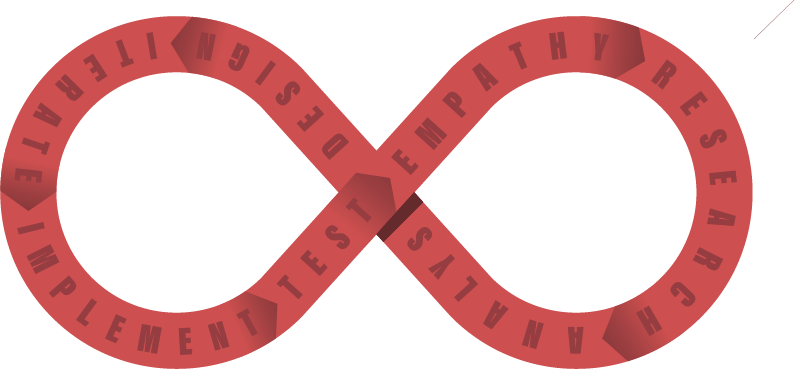
The UX Iterative Cycle—a process of continuous Discovery, Design, Implementation, and Refinement—is integral to quality user-centered products. Contrary to the diagram above, however, the process is quite non-linear.. Often we see these cycles on paper as a neat little process, but in reality the process of user-driven design is a “follow the need” methodology. At any given time in the process, the designer may find that more research or more design iteration is required and move laterally to that step in the process.
The true defining characteristic of this process is more agile, rapid iteration in the name of usability and enjoyment. What serves the user should be preserved, while any parts that don’t serve the user should be quickly jettisoned in favor of more discovery and understanding of the core needs that may be missing. With flexible, agile adherence to the system, a UX designer is able to rapidly create viable, effective designs that save your project thousands in R&D time and implementation.
How does it work though? Let’s break it down together.
Research & Discovery
Before we begin, we must first understand. To avoid designing in the dark, we must first identify the Core Need; the fundamental problem, motivation, or goal that drives a user to interact with a product, system, or experience. Oftentimes it is not simply ‘what users want’, but instead it is the truth beneath that, or ‘what users need’. A user may tell you “I want to know where my friends are in-game” but the core need may actually be ‘I need a way to stay connected with my friends,’ and not something similar like ‘show my friends physical location’.
Goal: Understand users/players, their context, and the problem space. Identify the Core Need.
User Research Methods:
Interviews, contextual inquiry, field studies, ethnography, card sorting, usability testing, eye tracking, tree testing
Surveys and analytics, A/B testing
Competitor analysis and benchmarking
Outputs:
Personas & archetypes
User journeys & experience maps
Problem statements & opportunity areas
Analysis & Framing
This is where UX earns its seat at the proverbial table. There are a multitude of positions in development that can bring in data or research, but it is a UX designer’s speciality to action on those insights and frame them in ways that can be understood and actioned upon by the entire development team and for the greater good of the business. The UX designer’s job is not just to find a problem and fix it. Their job is to find a problem and analyze the problem against the business and development goals. Then cross-reference that with the game design goals and challenges, developing actionable goals and hypotheses based on this analysis. Finally they present or act upon them based on feedback from stakeholders. After all, nobody will care if the users are happy, if the business is bankrupt, and no users will play if we remove good challenge in the name of usability.
Goal: Translate research insights into clear design challenges.
Activities:
Synthesize findings into actionable insights
Map user needs against business goals
Map user needs against design/narrative goals
Create hypotheses about what design will improve UX
Outputs:
Design principles
Prioritized requirements
UX strategy alignment
Design briefs
Acceptance Criteria
ideation & whiteboarding
Quantity first, quality later. As the saying goes, “Your first idea is probably your worst idea.” Design and creativity are difficult, especially when bundled together. UX problems are complex and intricate. You will never get it right immediately so the best course of action is to get a lot that you can narrow down into what is right. In my work I like to bring the team together for this step. The PO will run things, but more heads are always better than one. Run workshops, whiteboarding sessions, brainstorming workshops—all of these things are not only incredibly effective, but also remote-friendly methodologies for rapid ideation. If you are a small team or a team of one, don’t worry! Whiteboarding solo is still very effective, and there are other methodologies that lend themselves to solo work like IA breakdowns, user/task flows, and sketching. Whatever method works best for you and your project to get lots of ideas down fast.
Workshops Tip: Do not treat workshops as a requirement. You are asking people to take vital time out of their work schedules to help you with your work. You want to foster a positive appreciative open environment. Establish positive ground rules for workshops, provide positive reinforcement. The goal is not to get the perfect solution in your workshop. The goal is to get a lot of solutions. The more your attendees open up and feel relaxed the more ideas you will get.
Goal: Generate a range of potential solutions.
Activities:
Sketching, whiteboarding, brainstorming workshops, mind-mapping, crazy 8s, Scamper, Disney trio, roleplaying, storyboarding, six hats
Co-design with stakeholders and users, dot-voting, multi-disciplinary workshops
Information architecture (IA), user/task flows, and user stories
Inverse ideation, reverse brainstorming, worst-possible idea workshops (by finding the thing you hate you often better define what you actually want)
Outputs:
Wireframes (low-fidelity)
Interaction models
Concept prototypes
Solution lists
IA concepts/flows
Idea evaluation docs
Design & Prototyping
Time to bring your ideas to life on the page or in engine. With all of the information you have gathered, you want to narrow your design solutions down to three or fewer options. Take these best options and use an RP software (Figma, Axure, Etc) to prototype these ideas. As you gradually increase fidelity narrow your options down further and iterate. You may find that some ideas fall apart after getting into details. That’s okay. It’s part of the process. If it happens jump back to any of the previous steps to re-evaluate based on this new vital information you have learned and come back smarter and better prepared for success. Your goal now should be to stress test and prototype possible solutions until you feel confident in the rapid prototype. Avoid prematurely jumping to the implementation steps. Rapid prototyping in Figma is cheap and fast, Coding and UI art are slow and costly. You want to reduce risk and test when it’s easy to make changes. Once something is in engine you have to wait for overnight builds, or QA test plans, or that one person to return from PTO to get changes in, so focus on prototyping here where it’s agile.
Goal: Bring ideas to life for validation.
Fidelity levels:
Low-fi: paper sketches, clickable wireframes
Mid-fi: structured flows, grayscale prototypes, architecture breakdowns, complete click-throughs, logic-based RP
High-fi: visual design, UI art, animations, near-shippable interactions
Outputs:
Visual prototypes for design testing
Structured flows for flow testing and navigation
Interactive prototypes for usability testing
Visual ‘arted up’ screens for usability and design testing in context of the title
Design system components (if applicable)
Testing & Validation
The rubber hits the road. Your informed assumptions about effective solutions are put to the test. Up until this point you have been working based on research and professional wisdom, but no matter how wise you are nothing survives first contact unscathed. This is a fantastic opportunity to test your solutions in front of real players or users and see what actually happens. This is also a great opportunity to evangelize the effectiveness of UX. Many times in my career this moment is when game designers and engineers realize the importance of rapid prototyping and UX. They get in a room with a player and the player almost immediately does something unexpected. The player is not wrong, your assumptions didn’t account for them. This sounds like a great time to… jump back into the process and use that fantastic new research information you just acquired to tweak designs or perhaps revisit your multitude of whiteboard ideas to see if a different one you didn’t originally go with fits better with reality.
Remember: the player is never wrong; it was your assumptions about their behavior that were incorrect. You can’t force a player to not be themselves. That’s a fast track to churn.
Goal: Evaluate whether the solution works for users.
Usability Testing: Task completion, error rates, satisfaction scores
Cloze Testing
Player Testing: Alpha/Beta testing, Player Test Realms, Eyetracking, heat maps, user interviews, shoulder surfing
A/B or Multivariate Testing: Compare design variations
Analytics & Metrics: Funnel drop-off, time-on-task, retention
Outputs:
Insights into usability issues
Insights into player behavior
Evidence to pivot, persevere, or refine design
Recommendations tied to user pain points
Implementation
You’ve designed, validated, and tested your assumptions and are relatively confident in your findings. It’s time to bring in cross-discipline teams and schedule sprint work to implement your design! Collaborate closely with Art, Design, and Engineering to implement your designs. Keep in close contact while work is being done, looking out for technical issues or alterations that must be made for the sake of performance or viability. Creating UX solutions isn’t just about designing the perfect solution on paper. They must also be achievable in engine with the tools and time that we have. It won’t matter if the perfect solution is a guild system if that system will take three years to complete and you launch in 2 years. Talk with your co-developers often and early to avoid these issues, but when they do inevitably show up—you guessed it—jump back in the process and evaluate your solutions based on this new information. You won’t always be able to deep dive on testing at this point, but you should be able to evaluate the new design/engineering needs based on the information you were able to gather in that previous testing and apply it here.
Goal: Collaborate with engineering to build and launch.
Activities:
Design handoff (Figma, Axure, Design Components)
Cross-discipline collaboration (UX <> Art <> Design <> Engineering <> QA)
Accessibility & localization reviews
Outputs:
Live game features
Documentation for future iterations
Established KPI’s or KPI tracking
Measurement & Feedback
It’s built, it’s out there, and it’s alive! Now it’s time to track and measure. UX doesn’t end when the feature goes live, it is part of every PO designer’s job to shepherd their design once it is live. Set up time each sprint to track how it is faring. Is it healthy and usable? Is it being enjoyed by the user base? Use all this new information to create new Core Needs and hypotheses to start the process over again.
Activities:
Monitor KPIs (engagement, retention, satisfaction, error rates)
Collect user feedback through surveys, reviews, in-game prompts
Support team feedback (tickets, community forums, Discord, Twitch)
Outputs:
Performance dashboards
New hypotheses and backlog items
Input for the next research cycle
And Again. . . .
Time to start the process again! UX design and development is a continuous cycle evolving with the product. We intake new information and design parameters, conduct research, define hypotheses, Ideate and collaborate, prototype solutions, test, iterate, implement, and measure our designs. As we evolve our understanding of the game, the game evolves with us and we create a better, more accessible, inclusive game that can be enjoyed by millions around the world.